


Blog

Two Cool DIY Patios to Complete in a Weekend
Interested in creating a little outdoor living space on a shoestring budget? Instead of hiring someone to pour concrete or pour a concrete patio, consider one of these DIY options. Either one makes a great weekend project!
- Gravel Patio
Gravel is a low-cost material, perfect for patios and paths. If you plan to walk barefoot on your new patio, skip the crushed stone and go for pea gravel or creek gravel, both of which are tumbled by nature to round off the sharp edges. Mark off the area you want to turn into a patio and dig up the ground to make the area (mostly) level. (The gravel will handle the rest of the leveling work.) If you plan to use the earth itself as your patio base, dig down about 2.5 inches. If you prefer a tamped-down gravel underlay below the looser surface stones, dig down 4.5 inches to allow space for the stone base. Smooth and even out the soil beneath your future patio, using a 3-foot level to check your work.
Edging the Patio
Although the dug-out edges of your yard can hold the gravel in place, it’s better to add structured edging to keep the gravel from spreading into the yard. Edging also lengthens the life and improves the good looks of your patio. Options include:– Low-cost plastic landscaping edging from a home improvement store
– Pavers from a local garden store
– Natural stones you harvest yourself
– Railroad ties, cedar planks, or other treated lumber edgingBe sure the edging material rises about half an inch above the gravel, to help keep things in place.Prevent Future Maintenance Issues
Before adding any stones, cover the leveled soil with a thick layer of landscaping fabric, which will allow water to drain, but will not allow weeds to grow through. Skipping this step will guarantee a constant battle with weeds on your patio. Landscaping fabric… it’s your patio’s best friend!Gravel it In!
Fill the framed patio area with gravel on top of the landscaping fabric. Using a shovel and a garden rake, distribute the gravel and level it off.Personalize Your Space
Gravel patios can be enjoyed as is or turned into a place to display beautiful, natural, sentimental, or eclectic flat objects purchased or collected as time goes by. Turn it into a mosaic! Have a big flat rock you hauled back from a trip? Great! A brick you salvaged from the old family home? A paver you thought was beautiful? A concrete hand-imprint from the children or grandchildren? A piece of slate from a creek? If the item is weather-proof and mostly flat, just dig out a bit of the gravel, fit in the new find, rake the gravel back into place around the item, and enjoy your personalized outdoor living space! - Pallet Patio
Sure, you know that people make all kinds of things from pallets, but a patio? Can you really make a patio out of pallets? Yes, you can!
Be sure the pallets you select are:- Heavy-duty, industrial pallets
– Made to hold 1,000+ pounds
– Do not have missing or broken boards (unless you want to repair them)
– Have small, rather than large gaps between the boardsSizing and Foundation
It’s best to pick patio dimensions that don’t require cutting any of your pallets. For example, if you’re working with 4ft x 4ft pallets, 16 pallets are perfect for a 16ft x 16ft patio. To create a stable foundation for your pallet patio, set concrete blocks at the corner of each pallet. Dig down enough to “sink” the blocks into the ground, making each hole is as deep as the block, plus another 2 inches to add sand or gravel. Tamp the sand/gravel base down, until you have a solid, level surface for each concrete block. Make sure all the blocks are level with one another, adding additional base material as needed. The blocks should extend high enough for the pallets to rest on the blocks, above the surface of the ground. It’s also a good idea to lay down landscaping fabric, secured by these blocks, so you don’t have unwanted plants growing up between the patio slats.Preparing the Pallets
Be sure to paint or spray the pallets with a weather coating, sealant or weatherproof stain. If you prefer, they can be painted with outdoor or porch paint. A paint sprayer will make the job faster and easier. Once dry, place the pallets on the blocks with the slats all going in the same direction, or by turning every other one to create a checkerboard effect, adding visual interest. Attach them to each other for a more stable platform, or leave them “floating” for the ease of moving them around, replacing sections or changing the shape of the patio in the future. Now, add an indoor/outdoor rug, furniture, and planters and begin enjoying your pallet patio!
Click here to read the article.
Article by homebuying.realtor

Home staging can help sell houses
Real estate professionals know the importance of great photography. When searching listings on REALTOR.ca, if your clients like what they see, they’ll think about scheduling a viewing. And if they don’t, chances are they’ll swipe on to the next listing.
Like photography, home staging is about selling ideas and potential. A home has to say something about the type of person who would own it, and home staging professionals are experts at knowing how to create that feeling.
As a real estate professional, you understand buying or selling a home is an emotional experience. From the kitchen that invokes a gourmet feel, the rec room that hits a homerun with the sports fanatic or the walk-in closet that is truly a shoe-lover’s dream; helping potential buyers picture themselves in the space you’re selling can help them become excited and attached.
Click here to read more.

7 Stunning Spots to Watch the Leaves Change Across Canada
The gorgeous fall foliage that adorns our fair country every year proves that orange really is the new black. Fall in love with falling leaves this autumn at these seven stellar Canadian spots.
Humber Valley, NF
“Leaf peeping” is a major source of economic – and recreational – activity in Canada, ringing especially true in Humber Valley. For a region that survives predominantly on paper and pulp exports, you know trees are hot commodities. But they aren’t just a source of livelihood: The Long Range Mountains, part of the Appalachians, burst with every shade of citrus imaginable. If golf is your sport, enjoy this colourful display at River Course, named Canada’s Best New International Course by Golf magazine.
Click here to read more
Summer Treats
Here’s a couple of great summer recipes that are sure to be a hit every time out!!
Grown Up Grilled Cheese Sandwich
 Ingredients
4 tblsp Extra Virgin Oilve Oil (EVOO)
Kosher salt
4 tsp Dijon Mustard
2 Bartlett Pears
1 cup Caramelized Onion
1 cup each of grated Fontina and Gruyere Cheese
8 Slices of rustic or artisan bread
Using a BBQ or Le Crueset “Skinny Grill”, get the grill heated to medium.
Chop the onion and carmelize in a skillet using a tblsp of the EVOO and add a pinch of kosher salt
Take eight slices of a rustic loaf or artisan bread. Brush the outside of the bread slices with EVOO. Brush the insides with Dijon mustard.
Peel and slice the pears and layer thin slices on the bread.
Top with caramelized onion and 1/4 cup of each cheese. Cover with another slice of bread
Place on the grill til a couple wisps of smoke can be seen. Rotate until wisps of smoke are seen again. This creates the criss cross grill marks.
Flip and repeat. Remove and serve immediately.
These are awesome!!
Hawaiian Smoothie
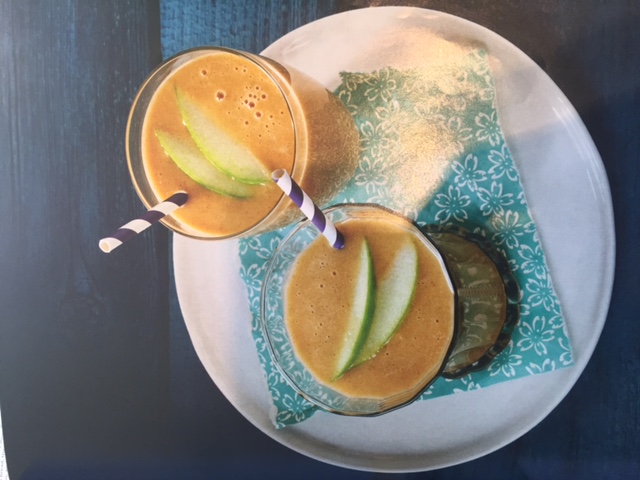 This non alcoholic cooler is loaded with chill and nutrition and plenty of island vibe!! A splash of coconut rum makes an amazing cocktail. The healthy ingredients diminishes the guilt!!
Makes 4
Add to the blender in the order below (split the ingredients if your machine is smaller)……
2 cups of water (more or less depending on preferred texture)
2 cups unsweetenened coconut milk beverage
2 cups frozen chopped mango
1 cup frozen chopped pineapple
2 chopped bananas
2 cups chopped unpeeled apple
4 servings of vanilla protein powder (substitute plain greek yogurt)
1 tsp of chia seeds
1 cup of ice cubes (more or less depending on preferred texture) Optional
Blend til desired consistency is reached, adding more water if you need to thin it. Pour in to a tall glass, add a large straw and a little parasol if you have it. Head for the beach!!!!

RAISE THE LIFE OF YOUR ROOF
You probably don’t think about your roof unless it is causing you problems. The easiest way to prevent roof problems is to regularly and consistently keep up on maintenance. Simple annual maintenance and upkeep can add years of life to your roof, and save you loads of money in the long run.
On HouseMaster Cloud, you can set maintenance reminders and receive email or text prompts to keep you updated and on top of all your housing needs. So, when the rain falls and the wind blows you can have confidence in the strength of your roof and home.
WARNING SIGNS
Watch out for these early signs of trouble:
- Dark areas on ceilings
- Peeling paint on the underside of roof overhangs
- Damp spots alongside fireplaces
- Water stains on pipes venting the water heater or furnace
- Moss and mold growing on shingles. Moss retains moisture and can cause damage to the roof when retained. Mold can attract other life forms that do cause damage.
EASY FIXES
- Hammer in loose nails and tighten metal roof bolts
- Replace missing or damaged shingles
- Clear the roof of debris
- Rust—wire brush, prime and paint the metal
- Damaged roof flashing—remove old caulk, scrub and clean, then reseal
- Cracks—if deteriorating seal cracked mortar or caulking around joints and chimneys
GUTTERS
- Slope properly and direct draining away from the house/foundation
- Make replacements and repairs and re-caulk and re-paint as needed
- Clean clogged gutters, install screens or covers, if desired, to help in the future
MOSS/MOULD
- Use a cleaner to remove and gently brush away moss and mold
- Do not use a high-pressure washer
Content provided by HouseMaster Cloud

Real Estate Study Planned for Downtown St. John’s
The study, a partnership between the Downtown St. John’s Business Improvement Area and the Altus Group, aims to check the “health” of Downtown St. John’s commercial real estate.
Continue reading →
March Marketplace Craft and Gift Fair
This spring craft fair in Conception Bay South is sure to have plenty on offer. If you don’t have any plans on Saturday, spend an hour or two browsing the tables. Hunt through the available wares to find a gem or two. There is no fixed entry cost. Instead, you are encouraged to make a donation. Donations will be used to help a local dance team fund an out-of-province tour.
When: Saturday, March 4th, 2017, from 10:30am to 3:30pm
Where: St. Thomas of Villa Nova Parish, Hiscock’s Lane, Conception Bay South
Tickets: Entry by donation / Vendor tables $35 each
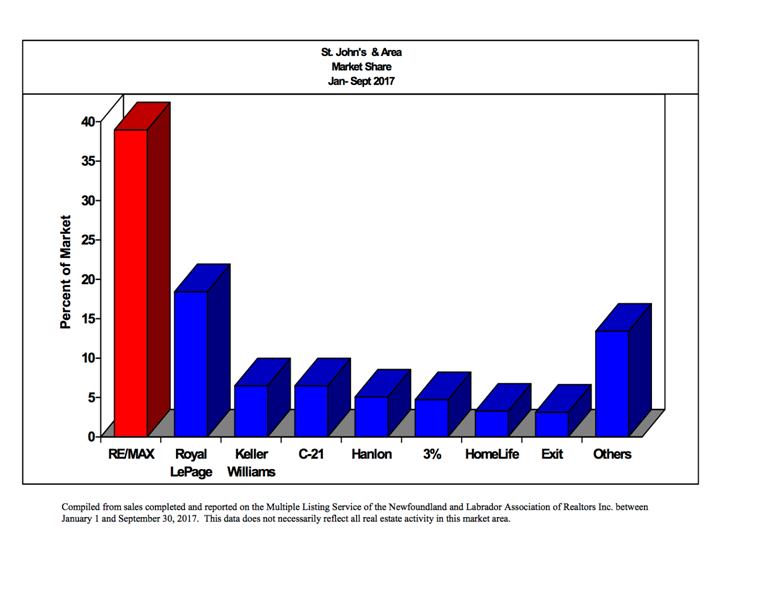
ST JOHN’S MARKET WATCH

Stats are based on homes in the area comparing December 2016 with the same month in 2015.
Historic Sales by Year
The data provided is from our MLS® system 2016 vs 2015 for in the areas we service which is the St. John’s CMA including Mount Pearl and Paradise, southern shore to Witless Bay, Northeast Avalon Peninsula to Pouch Cove, Conception Bay South, and Conception Bay North to Carbonear for residential properties and land. These statistics do not represent all MLS® activity for the area nor do they include commercial or farm listings.

Number of Listings sold for Residential and Lots calculated from 6,092 listings

Number of Listings sold calculated from 9,358 listings

Total Dollar Volume calculated from 9,109 listings

Average Sale Price calculated from 9,109 listings